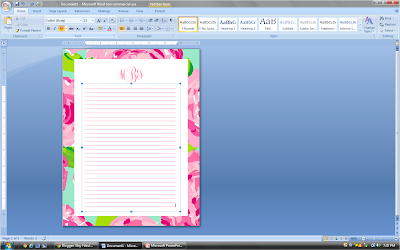
Monogrammed Lilly Stationery Tutorial
1. Obtain the font: If you don't have a monogram font installed on your computer, you can download one for free here. This is a safe and reliable download; it's the one I use!
2. Open a MS Word document
3. Choose a Lilly print: If you don't have one saved to your computer, Pulitzer Prints is one of my favorite sources. I also have the vast majority of them on mine, so email me if there's one you want but can't find. Don't limit yourself to Lilly either!
4. Insert the Lilly print into the MS Word document.
5. Set the text wrapping to "Through" and resize the print to take up the entire page.
6. Insert a text box: On the "Insert" tab, select "Text Box" and insert a "Simple Text Box". Resize the text box to take up the majority of the page, but leave borders. Leave the "Shape Fill" solid white, but remove the black "Shape Outline". Under the "Text Box Tools" tab that should open when you select the text box, find "Align" and align the text box to the middle and center of the page.
Note: If the background image disappears when you insert the text box, this is because you have it selected and are replacing it with the text box. Click off to the side to ensure the background image isn't selected before inserting it.
7. Insert another "Simple Text Box" and align it to the top and center of the page. Remember to remove the black "Shape Outline". Add your monogram here in a color that compliments your print. When using the Monogram KK font, enter your monogram in the format mBj. Capitalize the middle initial (your last name), but leave all three letters in the same font size. The font size will depend on how large you want your monogram and what your initials are. Mine is an 80.
8. Insert another "Simple Text Box" (this is the last one, I promise!). Remove the black "Shape Outline" and align it to the middle of the page. Resize it so that there is a little bit of space between the edge of the white and the borders of the text box. Click inside the text box and (in the same color as your monogram), begin typing lines on the page by holding down Shift and the line key (two to the left of the Backspace). After you get the first three lines drawn, copy and paste them until you take up the rest of the page. The font size you draw them in will depend on the size of your handwriting. I did mine in size 13.5 and it works well.
Note: Make sure that you are underlining the lines you draw. If you forget to do this, they will be broken up instead of solid.
9. Save, print, and enjoy!
My Stationery:
Lilly First Impression
Remember, if my screen clippings are too small, clicking on them will give you a full screen view!
Hope y'all enjoy this tutorial as much as you have my other ones. Happy writing!


I absolutely looove this tutorial!! I just had to share another one that I use: if you go to the Lilly Lifeguard Press website and look at the personalized stationery, you can put in your own initials (as if you were to order the stationery) and then save it as a picture! One time I even did it and printed out a friend's monogram and a cute picture of us on the other side. Super cute gift idea!!
ReplyDeleteHere's a link to one of the correspondence cards as an idea: http://www.lifeguardpress.com/product/lilly-pulitzer-personalized-correspondence-cards-monogram?display=377
Hope this works for you!
Meredith
monogrammeredith.blogspot.com
That's a really good idea! There are so many prints too! Thanks so much for sharing :)
ReplyDeleteIt looks like this was posted a while back, but I wanted to leave you a huge thanks for this tutorial. I'll be making teacher gifts and others for Christmas. Thanks for posting!!
ReplyDeleteYou are so welcome! Hope everything turns out nicely for you :)
DeleteI know this was posted a long time ago but this is great! Thanks for posting it.
ReplyDeletekatelyndanyale.blogspot.com
Great post! I was wondering if it's it possible to apply the design. So that it repeats on more than one page?
ReplyDelete