
Type One: Monogrammed Lilly
(The ones featured in my "Back to School" post)
- Obtain the font: If you don't have a monogram font installed on your computer, you can download one for free here. This is a safe and reliable download; it's the one I use.
- Open a MS Word document
- Choose a Lilly print: If you don't have any saved to you computer, Pulitzer Prints is one of my favorite sources.
- Copy and past the Lilly print to the MS Word document

- Resize the Lilly print to fit the page. DO NOT try to set the print as the page background. I did this at first, and it looks fine on the screen, but it ends up printing with a tiled background and doesn't look very nice. Be sure the text wrapping on the image is set to "through". This can be done by clicking on the image, opening the "Format" tab, and looking in the "Arrange" category.

- Add a circle. Under the "Insert" tab, click "Shapes" and select the circle. Set the alignment (again, look for the "Arrange" category under the "Format" tab. Make the circle a color that compliments the Lilly print, but not a main color of the pattern. I like to make the shape outline thick and white, but this is optional.

- Add the monogram. Don't just right-click on the circle and "Edit Text." Create a separate text box (Go under the "Insert" tab and select "Text Box") and align it to top and middle. Set the text box to have no border or fill color (change this setting under the "Format" tab). Play around with where you position the text box-- everyone's monogram is different, so the font size and position on the circle will depend on your particular initials. Note: When using the Monogram KK font, enter your monogram like this: mBj. Capitalize the middle initial (your last name), but leave all three letters in the same font size.

- If you're satisfied with this, go ahead and print it. If you want to add a class title, insert a rectangle just as you did the circle. Make the rectangle the same color as the circle, but leave off the outline (unless you just want it.) Align the rectangle to the bottom and center of the page, just like you aligned the circle to the middle and top.

- Right click the rectangle and choose "Add Text." Be sure the text is center aligned and the font color is the same as the monogram.

- Save it, print it, and show it off!


Type Two: Monogrammed Chevron
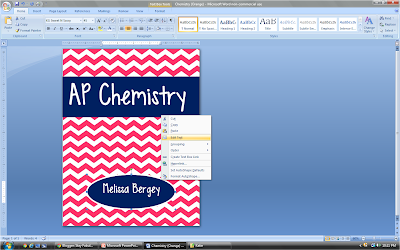
When one of my friends asked me to make her monogrammed chevron binder covers, I knew it'd be easy. I followed the exact same steps as I did to make the Lilly ones! Chevron is hard to work with when you're looking for high-resolution images, because the majority of chevron on sites like Google Images is so tiny! I followed some links from Pinterest and found the perfect site with lots of cute-colored, high-resolution Chevron! Here's the link. Just click on the color you like and copy & paste. Follow the same process you did for the Lilly ones! Here's one of the finished products:
Not going to lie, I think these came out pretty fabulous. She gave me some great color combinations to work with, so I figured I'd share them with y'all. They all look really, really good.
- Navy and green
- Light blue and orange
- Light blue and white
- Aqua and coral
- Pink and white
- Yellow and grey
Type Three: Class Title Chevron
Okay, so as hard as this is for me to comprehend, some people just don't want everything monogrammed. My sister Katie is one of those people. So, when she asked me to do her binder covers, I had to redesign my template a little bit. I used the same process, but designed them a little differently. Here's a tutorial.
- Open a MS Word document
- Choose a chevron color (see link above for a great site)
- Copy and paste the chevron onto the MS Word document

- Resize the chevron to take up the entire page (Again, don't just change the page color. The tiling effect is especially bad with chevron). Remember, set the text wrapping to "Through". This can be done by clicking on the image, opening the "Format" tab, and looking in the "Arrange" category.

- Add a rectangle. Under the "Insert" tab, select "Shape", then choose the rectangle. Align it to the top (Go to the "Arrange" category under the "Format" tab) and be sure it reaches the entire way across the page.

- Right click the rectangle and select "Add Text". Be sure the text is center aligned and type the class name in a complimenting font color (I usually go with white).

- Go back to the "Insert" tab and click "Shapes" again. This time, add an oval. I like to give it a thick white outline. Align it to the bottom and center of the page.

- Right click the oval and select "Add Text", just as you did the rectangle. Remember to center align the text and use the same font and color as you did the class title.
- Save it, print it, and show it off!


Remember, these don't just have to be in chevron or Lilly! Experiment with the background and color schemes! I'd love to see what y'all come up with! Please show me!
Enjoy the rest of summer, but here's to a stylish school year!
OMG THANK YOU SO MUCH!!!!!!!!!
ReplyDeleteYou are so welcome! I am like estatic that y'all use this! I'd love to see how yours come out! Email a picture if you want
ReplyDeletefor some reason I cannot figure out how to fit he image to the page on Word 2013
ReplyDeleteWhat you need to do is hit "Through", and then "Fix problem on page". Hope this helps. :)
DeleteWhere does it say " Fix problem on page?"
DeleteDid you make sure to set the text wrapping to "through"? If you are having problems, you can always send me the print you want and your monogram/class title and I'll email you a PDF of the cover!
ReplyDeleteI am having a problem with margins showing up, no matter what I try. I'm using Office for Mac. The margins are killing me!
ReplyDeleteJust email me your classes, favorite prints, and monogram and I'll take care of it for you!
ReplyDeleteI cant figure out where and how to obtain the monogram letters!
ReplyDeleteHere is a link to a website that allows you to download a monogram font to your computer: http://www.dafont.com/monogram-kk.font.
DeleteAnd here's a link to a tutorial on how to install a font: http://windows.microsoft.com/en-us/windows-vista/install-or-uninstall-fonts
If you still can't figure it out, just email me with the designs you want and I'll send you back PDFs of the covers! Hope this helps :)
I can not figure out how to make it take up the whole screen on Word 2007! Ideas?
ReplyDeleteMake sure the text wrapping on the image is set to "through". If you're still having problems, send me an email and I'll send you the PDFs!
DeleteSorry to ask again! Just trying to get this done before school starts!!
DeleteLol don't know why that sent! I just got your message! I keep clicking on through and nothing is happening.
DeleteThat's okay! Just email me what you want and I'll send them back to you :D
DeleteWith the lily print and the monogram?
ReplyDeleteClass titles too if you want!
Deletewhen your done setting it to "through" then what do I do? I tried re sizing it the fit the whole page but it does not work (the margins keep getting in the way).
ReplyDeleteJust email me what you want and I'll take care of it!
DeleteWhat font did you use for the "Class Tittle Chevron"?
ReplyDeleteI'm also having trouble fitting the image to the page. I'd like to figure it out so that I can arrange as needed in the future. I'm clicking "through" and all!
ReplyDeleteHi! I'm not sure if you are able to help out right now but I have a question about binder spines. I am trying to create some to match my gorgeous binder covers (made through your fantastic tutorial). Not sure how to do this. Are you available to help? Thanks!
ReplyDeleteI made the whole cover and everything and when I go to print the cover, my printer moves the monogram out of the center and towards the bottom of the circle. I have Windows 2010 and it has always worked fine. Any ideas???
ReplyDeleteI copied and pasted the picture but it wont fill the whole Word document. How can I get it to cover the whole page? Thanks
ReplyDeleteI cannot do the shape thing...
ReplyDeleteI've searched forever on how to do these binder covers! Very easy tutorial. Thank you!!!
ReplyDeleteI can't figure out how to fill the page with my chevron image either. I use the "through" as well and it won't re-size, it still shows my margins... I hope to get some help on this I'd like to know how to do my own binders. Any ideas on what I'm doing wrong?
ReplyDelete:-(